Geogrid Reinforced Walls: What Are They and How Do You Build One?
June 11th, 2024
Geogrids are vital components in reinforcing walls, ensuring stability and longevity, particularly in taller structures exceeding 4.0 ft. Join us as we delve into the essential steps and considerations for constructing robust and durable retaining structures that stand the test of time.
What is a Geogrid?
A geogrid is a geosynthetic material made from polymers, typically in the form of a grid or mesh structure. It’s used in civil engineering and construction projects to reinforce soil, providing stability to structures like retaining walls, slopes, and roadways. Geogrids distribute loads more evenly, reducing the risk of soil erosion and enhancing the overall strength and durability of the construction.
When are they used?
Walls exceeding 4.0 ft automatically experience active pressures due to their height. However, even walls shorter than 4.0 ft may require geogrid reinforcement depending on various factors, such as adjacent parking lots, roadways, or positive slopes. Geogrids, when used with appropriate lengths, layers, and compacted backfill materials, effectively resist these active forces above and behind the wall.
Do you need an engineer to install a Geogrid wall?
The need for an engineer to install a geogrid depends on various factors such as the complexity of the project, the type of geogrid being used, and local building codes and regulations. In many cases, especially for larger or more intricate projects, consulting with or hiring a qualified engineer is recommended to ensure proper installation and adherence to safety standards. Engineers can provide valuable expertise in designing the reinforcement system, selecting the appropriate geogrid specifications, and overseeing the construction process to ensure optimal performance and longevity of the structure. See a drawing of a LibertyStone Wall with Geogrid Reinforcement.
The steps for building a Geogrid Reinforced Wall
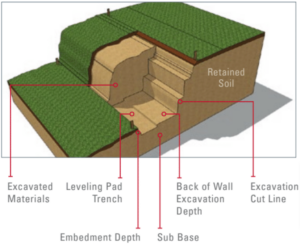
Step 1: Planning
- Excavate and prepare Sub Base Leveling Trench 6” below first course.
- Leveling Pad Trench is approximately 2.5’ to 3’ wide.
- Normal wall Burial Depth or Embedment Depth is 6” to 12” or one block (for more information refer to design manual).
- Excavate cut line to a 2 to 1 slope or greater.
- Back of wall excavation depth into the bank at the base of the wall should be from the face of wall to the designed length of Geogrid
Need help understanding a technical installation term? Use our online hardscaping glossary.
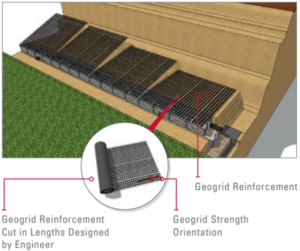
Step 2: Cutting
- Cut Geogrid Reinforcement to the length specified in the design.
- Geogrids are manufactured in two directions: Uni-axial or Bi-axial. Uni-axial grid has one direction of strength and that direction has to be oriented perpendicularly to the face of the wall during installation. Bi-axial grid can be laid in two directions, perpendicular and lengthwise to the face of wall (ensure that the lengthwise direction is still in accordance to the length specified by the Engineer’s design).
- Correct geogrid orientation, strength and length is crucial to the success of the wall project.
- Each geogrid length should be laid parallel and adjacent to each other but never overlapping
Step 3: Laying
- Place the geogrid as far forward on the units as possible without revealing it on the face.
- Place the next course of units on top of the lower units and geogrid at a half bond.
- The two SecureLugs will fit securely into the hollow cores of the two units below and lock the geogrid into the gravel core. The SecureLip of Fortus will fit securely behind back edge of the blocks below.
- Pull the unit forward to engage and align the SecureLugs
- Complete the installation of units on the Geogrid Reinforced courses.
- Make sure each unit is installed against the next unit, leaving no gaps between unit joints.
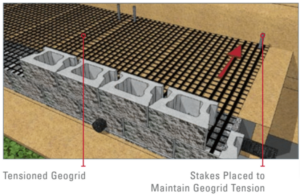
- Tension the geogrid in such a way as NOT to disturb the alignment of the upper units.
- Use stakes or backfill materials to maintain the tension during backfilling.
- Do not drive equipment directly on top of geogrid.

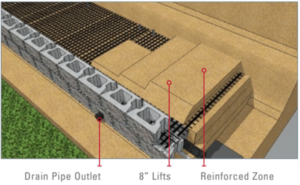
Step 4: Reinforce Backfill
- Backfill and Compact the Reinforced Zone by placing materials from the back of the wall towards the end of the geogrid.
- Install drainage gravel in the cores and 6” to 12” behind the units after placing and compacting backfill materials.
- Install and compact Backfill Materials in 8” lifts for CornerStone 100™ or Fortus™ until wall is complete.
Start Building A Geogrid Wall Today
Whether constructing retaining walls, slopes, or roadways, geogrids play a pivotal role in long-lasting infrastructure. While hiring an engineer for installation may be necessary for complex projects, LibertyStone’s retaining wall products empower contractors to build robust structures efficiently and effectively. Find a local dealer and start building your geogrid reinforced wall with confidence today!