Building Perfect Pillars: The Essential Guide
April 30th, 2024
In the realm of outdoor aesthetics, hardscaping pillars stand as timeless symbols of strength, sophistication, and architectural grandeur. These versatile structures add visual interest and vertical dimension to retaining walls and landscapes, as well as serve a multitude of practical purposes.
From defining boundaries and framing entryways, to providing structural support for pergolas and accentuating garden pathways, pillars offer endless possibilities for enhancing the beauty and functionality of outdoor environments.
What you should know before you begin
When embarking on the planning process for pillars in your outdoor space, it’s essential to consider the following factors to ensure a successful and cohesive design.
First, contemplate the intended purpose of the pillars—are they decorative, functional, or a combination of both? Understanding their role will guide decisions regarding size, placement, and architectural style.
Next, take into account the overall aesthetic and theme of your outdoor environment. Whether your design leans towards classical elegance, modern minimalism, or rustic charm, the pillars should complement and enhance the existing landscape.
Additionally, think about practical considerations such as structural integrity, material selection, lighting, and maintenance requirements. By addressing these fundamental aspects early in the planning phase, you can lay a solid foundation for creating pillars that enhance the visual appeal of your outdoor space and also fulfill your practical needs.
Steps to building a pillar or column
LibertyStone’s 6” & 8” high universal 90 degree corners create perfect 27”x27” columns quickly and easily. Additionally, the units fit seamlessly with both our CornerStone and Fortus Square Foot wall systems. The unit’s hollow cores greatly simplify the placement of lighting in the pillars.
This section provides simple instructions for the creation of a 27” pillar.
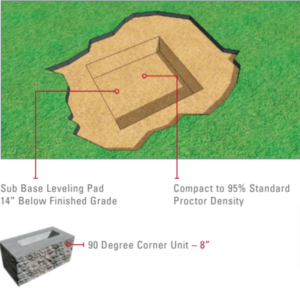
Step 1: Leveling Pad
- Excavate and prepare your Sub Base Leveling Pad
- Install leveling pad of well graded gravel (also known as road base aggregates) a minimum of 8” thick and 40” square. Compact to 95% standard proctor density;
- Install the first 4 corner units perpendicular and square to each other
- Ensure first base course is level and square to the center of the pad;
- Bury the first course completely for stability

Step 2: Second Course
- Place second course of the 90° Corner units directly on top of the first course;
- Flip and turn the second course corner units upside down to create an overlapping bond;
- Clear Crush Drain Gravel (Angular Aggregates free of fines) should be placed in the cores and middle of pillar (concrete core filling optional) use a dry concrete mix to prevent leaching of cement;
- Concrete Adhesive should be applied to all units to ensure course to course interlock
Step 3: Additional Course
- Repeat step 1 and step 2 until desired height of pillar is reached.

Step 4: Completion
- Complete the pillar with a Pillar Cap
- Secure the Pillar Cap with a concrete adhesive
By carefully considering their purpose, aesthetic integration, and practical requirements, you can ensure that your pillars not only enhance the visual allure of your outdoor environment but also serve as enduring symbols of architectural elegance and strength.
Need professional help building hardscape pillars and columns?
Ready to bring your pillar design to life? Contact us today for recommendations on professional installation assistance.